ChilliSpot 1.0
Release Notes
These release notes describe system requirements, installation
instructions, and known issues for ChilliSpot 1.0.
These release notes are updated
when we receive feedback, so please check back for new information.
What's new in
ChilliSpot 1.0
Bug fixes
1.0 corrects the following bugs:
- Macallowed and uamallowed
options can be specified multiple times ChilliSpot now accepts
multiple lines with macallowed or uamallowed in the configuration file
or multiple times at the command line. Previously the list of MAC
addresses or domain names had to be limited to a single line, which
again was limited to 255 characters. Thanks to David Bird for the first
implementation, and Lorenzo Bettini for upgrading Gengetopt
to support long lines.
- Improved
IP allocation after
restart for MAC authenticated users Users
which have been authenticated on the bases of MAC address will now be
re-authenticated straight after a ChilliSpot reboot.
Furthermore copyright statement and credits has been included with the
program.
What's new in
ChilliSpot 1.0 RC3
Bug fixes
1.0 RC3 corrects the following bugs:
- Improved IP allocation after
restart ChilliSpot will now reallocate IP addresses imediately
after restart. Previously wireless clients had to issue a new DHCP
request in order to login again after a restart.
- Improved Skype compatibility Previously
unauthenticated Skype users caused excessive CPU usage. This has now
been reduced to an acceptable level.
- Better parsing of --uamserver and
--uamhomepage options It is now possible to specify a port
number as part of the URL for the --uamserver and --uamhomepage
options. At the same the port restrictions has been removed so that
wireless clients now have full IP layer access to the IP addresses of --uamserver and --uamhomepage. Thanks to
Drew S. Dupont.
- Daemon will now write debug output. While
running as daemon ChilliSpot will now write debug output to stdout.
- Corrected memcpy bug on --uamallowed option
Error caused only part of uamallowed option to be copied.
Thanks to Jerome Heulot.
- Improved redundant radius retry Previously
ChilliSpot would alternate between radiusserver1 and radiusserver2 on
retries. Now it will retry 3 times on the same radius server before
switching to the other.
Furthermore a new --radiusnasporttype option has been added which
specifies the NAS-Port-Type radius attribute to use.
What's new in
ChilliSpot 1.0 RC2
Bug fixes
1.0 RC2 corrects the following bugs:
- Errors when run as daemon
A bug introduced in 1.0 RC1 caused a number of problems when run in the
background. This affected Session-Timeout, interim accounting and
lost-carrier disconnect as well some as other features.
- ChilliSpot-Max-Total-Octets This attribute now works as intended.
What's new in
ChilliSpot 1.0 RC1
Volume Limit
Attributes
ChilliSpot now supports three volume limit attributes:
- ChilliSpot-Max-Input-Octets
Maximum number of octets the user is allowed to transmit. After this
limit has been reached the user will be disconnected.
- ChilliSpot-Max-Output-Octets Maximum number of octets the user is
allowed to receive. After this limit has been reached the user will be
disconnected.
- ChilliSpot-Max-Total-Octets Maximum number of octets the user is
allowed to transfer (sum of octets
transmitted and received). After this limit has been reached the user
will be disconnected.
In order to use the new attributes a radius dictionary must be copied
to the radius server. The dictionary file is found under
doc/dictionary.chillispot.
Furthermore the ChilliSpot byte counters have been changed so that they
do not count packets which has been dropped by ChilliSpot as part of
traffic shaping. Thanks to Philipp Kobel <philipp.kobel@lin.at>
and Harald Jenny <harald@lin.at> for supporting the work on
volume limit attributes.
Re-reading
Configuration File
When sent a HUP signal the ChilliSpot daemon will now re-read the
configuration file and perform domain name lookups. The configuration
file can be re-read without disconnecting active users. Furthermore a
new --interval option will cause the configuration file to be reread at
regular intervals.
Native EAPOL
ChilliSpot has a new --eapolenable option which will enable ChilliSpot
to perform EAPOL authentication. With this option chillispot works as
an EAP authenticator. Currently ChilliSpot does not set encryption
keys, so WAP is not supported with native EAPOL.
What's new in
ChilliSpot 0.99
WISPr Appendix D
Compliance
Chillispot is now compliant to WISPr Appendix D which specifies the
communication between a smart client and a HotSpot. This means that
users which have a smart client installed can now login to ChilliSpot
without using the web browser.
Thanks to Stefan Lengacher for helping
out with this feature, and a special thanks to WERoam which has sponsored the work
on Appendix D.
Radius Disconnect
Support
Chillispot now supports RFC 3567 Radius-Disconnect messages.
RFC 3567 allows an administrator to send a radius Disconnect-Request
message to a NAS on UDP port 3799. The message should as a minimum
include the User-Name attribute. Once the NAS has received this message
it will disconnect the user and send back an acknowledgment. Also an
accounting stop message will be sent to the radius server.
To use the feature you would execute ChilliSpot
like this:
chilli -c chilli.conf --fg --debug --coaport 3799 --coanoipcheck
Based on the accounting records you check which users are currently
logged on. In order to log off a user you can use the radclient program
provided with freeradius:
echo "User-Name = user" | radclient 10.0.0.219:3799 40 secret123
Received response ID 219, code 41, length = 20
A response code of 41 indicates that the disconnect was
successful. 42 means that the user was not connected.
RFC 3585 style MAC
addresses
ChilliSpot now format MAC addresses as specified in RFC 3585. This
applies to Called-Station-ID, Calling-Station-ID radius attributes as
well as a few other places where MAC addresses are formatted as text.
MAC address forwarded
to UAM server
The user's MAC address is now forwarded to the UAM server. Thanks to
Jacques Crocker.
Limit MAC
authentication to specific MAC addresses
With MAC authentication it is now possible to limit authentication
requests to certain MAC addresses. The new option is used as follows:
--macallowed 000A5EACBE51,00301B3C32E9
Which indicates that MAC authentication will only be used for the MAC
addresses 000A5EACBE51 and 00301B3C32E9. All other clients will use
normal Web based login. Thanks to pda.
Initial FreeBSD port
ChilliSpot now compiles and runs under FreeBSD. Tested under FreeBSD
5.3.
Bug fixes
- Bandwidth limitation on MAC
authentication: ChilliSpot now correctly limits the bandwidth
when using MAC authentication. Thanks to micheld.
- Better IP address allocation. After
reboot ChilliSpot will now try allocate client the same IP address as
was allocated before the reboot.
- Cleanup and quality assurance on
source code. Thanks to Jonny Winberg.
What's new in
ChilliSpot 0.98
ChilliSpot 0.98 is a maintenance release, which includes bug fixes for
bugs discovered since the last release.
Bug fixes
- Session-Time disconnect and
accounting records: A bug caused ChilliSpot to stop sending
accounting records for some users and not logout the user when the
Session-Timeout attribute was used. The bug would appear for certain
logon/logoff patterns. This bug has been fixed in release 0.98.
- Static IP: Static IP
with MAC authentication did not work for some configurations. This has
been fixed in release 0.98.
What's new in
ChilliSpot 0.97
Free Radius Hosting
ChilliSpot radius hosting is now available. The service is a
limited functionality of the commercial HotRadius service,
and can be used for home hotspots and for testing of ChilliSpot.
Hosting is free for non-commercial use. Check it out at http://radius.www.chillispot.org.
Please support ChilliSpot development by using HotRadius for your commercial
hotspot.
Improved
hotspotlogin.cgi
- IE XP SP2 Compatibility:
ChilliSpot pop-ups are now compatible with Internet Explorer Windows XP
SP2.
- Redirect to homepage:
After successful logon user is now as default redirected to his
browsers configured homepage. If using WISPr-Redirection-URL in the
radius accept package the user will instead be redirected to this URL
instead.
- Online counter: The
ChilliSpot pop-up window now displayes the total online time. If the
session timeout attribute is used the time left is shown instead.
- API change: The interface
between the ChilliSpot daemon and web server has changed. This
unfortunately breaks compatibility with users own scripts, but the
interface should now be stable for some time....
- Logout keyword: If the
pop-up has been lost the user can return to the logout page by typing
"exit" in the location bar.
Radius attributes
- ChilliSpot now supports Acct-Input-Gigawords and
Acct-Output-Gigawords. Thanks to Paul Annesley and Russell Brenner.
- The usage of Acct-Input-Octets and Acct-Output-Octers has been
reversed so that they are now in compliance with RFC 2866.
What's new in
ChilliSpot 0.96
New configuration
options
- uamhomepage: Redirect
unauthenticated users users to this URL. This URL can display
information about the hotspot, and should include a link to
http://192.168.182.1:3990/prelogin in order to let the users log in.
- uamanydns: Allow
unauthenticated users to use any DNS server. This is needed for users
which have configured fixed DNS servers. For security reasons this
option should be combined with destination NAT to the hotspots ordinary
DNS server. Thanks to Alexander Papadakis.
- macauth: Allow mac
authentication. When this option is given ChilliSpot will first attempt
to authenticate based on the MAC address. If unsuccessful normal UAM
authentication takes place. Thanks to Gavin for
suggesting this feature.
- macpasswd: Password to
use for MAC authentication.
- macsuffix: Suffix to add
to MAC address in order to form the User-Name. If omitted the MAC
address will be used as User-Name.
- statip: IP address and
netmask to use for static IP address allocation. When this option is
given ChilliSpot will use the Framed-IP-Address radius attribute for
allocating the IP address. This feature only works for MAC
authentication and WPA. Thanks to Alexander Papadakis for doing the
initial work on static IP.
Source code review,
bug fixes and additional logging.
The limitation in version 0.95 which limited the number of concurrent
clients has been removed and the code has been optimized for large
hotspots. Thanks to Alexander Papadakis for
reviewing the code.
Additional logging has been introduced. Thanks to Vladimir Vuksan.
What's new in
ChilliSpot 0.95
Browsing some web
sites without authenticating
A new "uamallowed" configuration option is included in this release. It
allows the user to communicate with a specified list of domain names,
IP addresses or network segments without first authenticating. The new
option can be used for several purposes:
- The user can connect to a credit card payment gateway in order to
pay for service before connecting.
- Allow the user to browse free content such as community or
hotspot related information without authenticating.
- Allow corporate users using the corporate HotSpot to connect to a
VPN server without authenticating with ChilliSpot.
Thanks to Dan Strohschein.
Improved makefiles
Changes to makefiles and some of the source code has been modified in
order to improve the install experience on Gentoo.
Thanks to Ned Lud.
More information to
perl cgi script
More information is transferred to the perl cgi script. Upon successful
authentication the perl script will now be provided with the following
additional information:
- User-Name. The username is sent back to the cgi script as an
"uid" cgi parameter.
- Session-Timeout. Bases on the Session-Timeout radius attribute
the remaining time for this connection is sent back as a "timeleft" cgi
parameter. This allows cgi script developers to include a
javascript based counter which will display the time left before the
connection is terminated.
- Original URL. The URL that the user originally requested is now
sent back to the cgi script as an "userurl" cgi parameter. This allows
cgi script developers to redirect the user to the original URL after
they have been authenticated.
Note that the "userurl" cgi parameter is set to the first URL the
client tries to connect to. Some browsers connect to multiple URLs at
the same time. This might result in unexpected browser compatibility
problems.
Configuration of
network interface
ChilliSpot will now bring up the network interface if it has not
already been configured.
What's new in
ChilliSpot 0.94
- Initial OpenWRT port.
- Compatibility bug-fix for Yahoo companion modified web browsers.
- New radiusauthport and radiusacctport configuration options for
compatibility with radius servers using non-standard port numbers.
What's new in
ChilliSpot 0.93
- Radius Reply-Message now fully implemented.
- Better error handling when chilli.conf or web server is
misconfigured.
- Gracious shutdown. When killed chilli will now log off users,
send radius accounting stop messages and then free allocated
resources.
What's new in
ChilliSpot 0.92
- Radius Session-Time, Idle-Timeout as well as WISPr attributes.
- Bug fix: User will now actually be logged out when pressing
"Logout".
What's new in
ChilliSpot 0.91
- Radius interim accounting
- Improved cgi script with popup logout window.
- Removed proxy warnings when not using WPA.
What's new in
ChilliSpot 0.90
New Additions to the
Release Notes
None
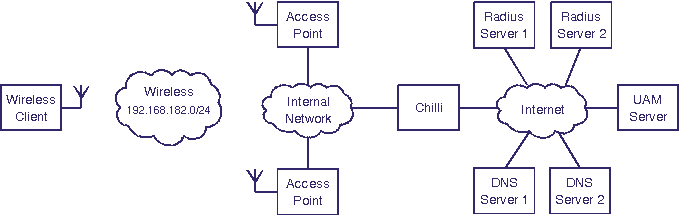
Introduction
ChilliSpot is used as an access point controller in a wireless LAN. A
typical network architecture is
shown in
the figure below. A wireless client
can establish a wireless connection to an access point, but in to
reach the External Network it
first has to authenticate with Chilli.
Three different networks are involved in the architecture:
- External Network. The external network is typically the
Internet or a corporate intranet. Access to the external network is guarded by Chilli which only allows
traffic from authenticated wireless
clients to pass.
- Internal Network. The internal network is connecting the
access points with Chilli.
It is used for forwarding Ethernet frames between Chilli and the wireless clients as well as for IP
management traffic to and from the access
points.
- Wireless Network: The wireless clients are connected to
the wireless network, and the
access points serve as
bridges
between the internal network
and the wireless network.
This enables forwarding of Ethernet frames between Chilli and the wireless clients. In the example
above the wireless network is
allocated the address range 192.168.182.0/24.
In order to function properly Chilli
is dependent on a few external servers:
- DNS Server. When
accessing the external network
the wireless clients rely on
one or several DNS servers
for resolving domain names to IP addresses. The wireless clients are informed of
the DNS server IP addresses
by the Chilli. Before you start the installation of ChilliSpot you need
to determine the IP address of at least one DNS server
which can be used by the wireless
clients. If you don't specify a DNS server Chilli will use the DNS server
which is reported by the underlying operating system.
- UAM Server. When a user
logs on she is redirected to an authentication web server which queries
the user for her username and password. If a separate uam server is not available it
is possible to install one the Chilli
server.
- Radius Server. User
credentials are stored in one or several radius servers. Whenever a wireless client attempts to connect
to the network Chilli
will contact a radius server
in order to validate the user credentials. If a separate radius server is not available it
is possible to install one on the Chilli
server.
Generally the access points should be configured with open
authentication and no encryption. Authentication is handled by Chilli. For better security the
access points should be configured for Wireless Protected Access.
Installing on RedHat
9, Fedora (FC1, FC2 or FC3)
Requirements
- Intel pentium class 233 MHz (or faster) processor
- 2 network interface cards
- 64 MB of RAM
- 1 GB hard disk (if installing new operating system)
- 10 MB of free hard disk (if using an already installed operating
system).
- Redhat 9, Fedora 1, Fedora 2.
Before you start
Before you start installing ChilliSpot you will need the following
hardware and software:
- A suitable PC with 2 network cards (see under system
requirements).
- Redhat 9 installation CD's (available from www.redhat.com) OR Fedora 1 or Fedora 2 installation
CD's
(available from fedora.redhat.com
).
- ChilliSpot installation file for Redhat 9, Fedora 1
or Fedora 2 (chillispot-1.0.i386.rpm).
Available as download from www.chillispot.org.
You also need to determine the layout of your network. Use the figure
shown in the introduction as a starting point. For the wireless
network and internal network you can use the IP
addresses given in the introduction.
The IP addresses of the external network is normally determined
by an existing configuration, so you need to find the IP address as
well as netmask for this network. Furthermore a gateway IP address is
normally required. If you are using dynamic IP address you do not need
to configure the IP address and gateway information.
Installing Redhat or
Fedora
Redhat or Fedora is installed as described in the documentation
provided with the distribution. In this sections the parts of the
installation which
requires special attention is further described.
During the installation you will be asked a to select a
number of options.
Under "Installation Type" choose "Server"
Under "Network Configuration" configure the interfaces as appropriate.
- eth0: This will be the external interface of ChilliSpot
(normally connected to the Internet). Configure this interface for DHCP
OR if you are using a
static IP address you need to configure both IP address and netmask.
- eth1: This will be the internal interface of ChilliSpot. This
network Interface should not be configured as it is automatically
configured by ChilliSpot.
You need to manually set the hostname of the server. In this example we
use "chilli".
If you use DHCP for the external interface you do normally not have to
configure anything under "Miscellaneous Settings". If you use static IP
you will need to fill in "Gateway" as
well as "Primary DNS". You may optionally fill in "Secondary DNS" and
"Tertiary DNS".
Under "Firewall Configuration" choose "Enable Firewall" (Redhat 9:
Security level "Medium"). We will
customize the firewall rules later during the installation, so for now
you can leave the other firewall options as they are.
Under "Package Group Selection" select the following packages:
- "Server Configuration Tools"
- "Web Server" (Not needed if using a separate UAM Server)
- Under details for "Network Servers" select "freeradius"
(Not needed if
using a separate Radius Server)
- Administration Tools
For for RedHat 9 you need to download and compile freeradius manually
from www.freeradius.org. No
other packages are needed by Chilli. The above installation requires
approximately 850 MB of hard disk space. You might
also want to install a graphical user interface or other packages. This
however is not required by Chilli.
After you install Linux the system will reboot. Log in as root, and you
are ready to install the rest of the software.
Installing and
Configuring ChilliSpot
ChilliSpot is installed by issuing the commands:
rpm -i http://www.chillispot.org/download/chillispot-1.0.i386.rpm
During installation of
ChilliSpot a configuration file was
copied
to /etc/chilli.conf. You need to edit this file. A description of
each option is given in the man page (man chilli).
As a start you can leave most of the parameters as they are. If you use
an external radius server you need to modify the parameters:
- radiusserver1
- radiusserver2
- radiussecret
If you are not using an external radius server you can leave these
parameters as they are, as we will install a radius server later during
the installation.
If you use
an external UAM server you need to modify this parameter:
If you are not using an external UAM server you can leave this
parameters as it is, as we will install an UAM server later during
the installation.
In order to automate startup of chilli issue the command:
chkconfig chilli on
ChilliSpot will start next time you reboot the system, or you can
start it directly by issuing the command
/etc/init.d/chilli start
Firewall Setup
It is important to protect ChilliSpot from unauthorized traffic. No
single firewall ruleset can satisfy all network configurations, and
generally you
should write your own set of rules. As a starting point you
can use the script located in:
/usr/share/doc/chillispot-1.0/firewall.iptables
You can edit this file to suit your own configuration or simply use it
without modification. Once you have edited the file install it
by issuing the following commands:
/etc/init.d/iptables stop
/usr/share/doc/chillispot-1.0/firewall.iptables
/etc/init.d/iptables save
This will first clear the current firewall rules, install the new rules
and finally save the rules so that they will be restored whenever the
system is rebooted.
In order for ChilliSpot to forward network packets, IP
forwarding must be turned on in the kernel. You need to change
the line which reads net.ipv4.ip_forward = 0
in /etc/sysctl.conf to the following:
net.ipv4.ip_forward = 1
The changes take effect when you reboot the system, or you can activate
them directly by issuing the command
/sbin/sysctl -p
If you use an external radius and UAM server this concludes the
installation. You should now reboot the system in
order to make sure that all the changes you made take effect.
If you are not using an external Radius and/or UAM server you need to
install these as described below.
Installing and
Configuring UAM Authentication Web Server
The web server Apache was installed as part of the Linux installation.
We will now configure Apache to request username and password from the
wireless clients.
During installation of ChilliSpot a cgi script was placed in
/usr/share/doc/chillispot-1.0/hotspotlogin.cgi. You should copy this
script to /var/www/cgi-bin/hotspotlogin.cgi on your web server.
In order to automate startup of Apache issue the command:
chkconfig httpd on
Apache will start next time you reboot the system, or you can
start it directly by issuing the command
/etc/init.d/httpd start
You need to tell Chilli about the location of the authentication
server. This is done by uncommenting and editing the following line in
"/etc/chilli.conf":
uamserver https://192.168.182.1/cgi-bin/hotspotlogin.cgi
You need to restart chilli in order for the configuration changes to
take effect:
/etc/init.d/chilli restart
Installing and
Configuring FreeRADIUS
The Radius server FreeRADIUS was installed as part of the Linux
installation (For Redhat 9 you need to install FreeRADIUS manually).
We will now configure FreeRADIUS to authenticate the HotSpot users.
Read the FreeRADIUS documentation in order to configure the server. As
a minimum you will need to add users. This is done by
editing the file "/etc/raddb/users". For testing purposes you can
uncomment the entry called "steve", or you can use the file
"/usr/share/doc/chillispot-1.0/freeradius.users" as a template.
You might also want to edit
"/etc/raddb/clients.conf" in order to configure the IP address and
shared secret of chilli. The secret configured in
"/etc/raddb/clients.conf" must match the radiussecret parameter in
"/etc/chilli.conf".
In order to automate startup of FreeRADIUS issue the command:
chkconfig radiusd on
FreeRADIUS will start next time you reboot the system, or you can
start it directly by issuing the command:
/etc/init.d/radiusd start
You need to tell Chilli about the location of the radius
server. This is done by uncommenting and editing the following line in
"/etc/chilli.conf":
radiusserver1 127.0.0.1
radiusserver2 127.0.0.1
radiussecret testing123
You need to restart chilli in order for the configuration changes to
take effect:
/etc/init.d/chilli restart
You can test your configuration by using a wireless LAN laptop.
Associate with the access point, and start a web browser. You should be
able to login using the username "steve" and the password "testing".
If you want to integrate FreeRADIUS with MySQL, PostgreSQL or do
something else advanced then www.freeradius.org
is the best source of information.
Installing on Debian
Sarge
Requirements
ChilliSpot uses the tun package. You need at least tun
version 1.1. With Linux tun is normally included from kernel version
2.4.7. On Debian you might need to manually create the tun device:
mkdir /dev/net
mknod /dev/net/tun c 10 200
To configure automatic loading you might also need to add the
following line to /etc/modules.conf:
alias char-major-10-200 tun
Execute depmod -a to update the changes.
Get hold of the latest .deb package from www.chillispot.org.
Installation
Installation
is performed by issuing the following command:
dpkg -i chillispot_1.0_i386.deb
Network Configuration
For most installations eth0 will be the interface connected to the
Internet, and eth1 will be the interface connected to the access points.
- eth0: Should configured and connected to the Internet (or
intranet). Routing, default gateway and DNS need to be working.
- eth1: Should not be
configured with an IP address, but be in the
UP state (ifconfig eth1 up). For advanced configurations you can
configure eth1 with an IP address to use for access point management
traffic.
In order to enable packet forwarding you should change the following
line in /etc/network/options:
ip_forward=yes
Then you have to restart networking:
/etc/init.d/network restart
In order to enable firewall and NAT you can use the firewall script in
"/usr/share/doc/chillispot/firewall.iptables" as a starting point.
After you have reviewed the firewall rules you execute the script by
issuing the command:
sh /usr/share/doc/chillispot-1.0/firewall.iptables
The firewall script needs to be executed every time the computer is
restarted.
Web server
If you are using your own web server you should follow the instructions
under Fedora on how to install hotspotlogin.cgi on
the web server.
Radius server
If you are using your own radius server you should follow the
instructions under Fedora on how to install the radius server.
Installing on FreeBSD
The FreeBSD port is still experimental. Please test and report bug
fixes. The instructions below is for testing ChilliSpot on FreeBSD 5.3.
Compilation and
Installation
Download the latest ChilliSpot source code. Unpack the tarball and
issue the following commands:
./configure
make
make install
Network Configuration
In order to use ChilliSpot you normally need to configure both a
firewall and NAT. To do this you need to add the following to the
configuration file in /usr/src/sys/i386/conf and recompile the kernel.
options IPFIREWALL
options IPFIREWALL_VERBOSE
options IPFIREWALL_VERBOSE_LIMIT=0
options RANDOM_IP_ID
options IPDIVERT
After recompiling the kernel you need to configure the firewall,
install a web server and install a radius server.
Installing on
OpenWRT
The OpenWRT port is still experimental. Please test and report bug
fixes. The instructions below is for testing ChilliSpot on the OpenWRT.
Not for setting up a production system.
You should be familiar with OpenWRT before attempting to install
ChilliSpot. With OpenWRT it is very easy to mis-configure the access
point in a way which does not allow further modification.
Before you start
These installation notes assume that you are using OpenWRT on a Linksys
WRT54G.
Before you start installing ChilliSpot you will need the following
hardware and software:
- A Linksys WRT54G version 2.x. These instructions assume you are
installing on
a new access point. At the back of the access point it should say
something like "Model No WRT54G ver. 2". You might able to install on
other versions, but this is currently untested (and not documented).
- A PC with a DHCP client, web browser and telnet for
configuring the access point.
- An Internet connection which can be connected to the access
point. The Internet connection should allocate a DHCP IP address to the
access point. For a production system you will need a static IP address.
- OpenWRT firmware. The firmware used for these instructions was
downloaded from http://www.wildcatwireless.net/wrt54g/.
The relevant file is called openwrt-g-code.bin for WRT54G or
openwrt-gs-code.bin if you are using WRT54GS.
Installing OpenWRT
Before you continue it is recommended that you set the boot_wait
parameter. This
enables you to install new firmware even if the old firmware was
corrupted. Check out http://openwrt.org for
details.
Installing OpenWRT on the Linksys WRT54G might or might not void your
warranty. Proceed at your own risk.
Connect your PC to LAN port 4 of the access point using a standard
Ethernet cable. Assuming your PC is configured to use DHCP you should
be allocated an IP address. Start a web browser and go to the access
point
homepage: 192.168.1.1. Password is "admin". Go to the
Administration/Firmware section, and
download the OpenWRT firmware.
Wait a while. Then telnet 192.168.1.1, which is the IP address of your
OpenWRT installation.
If you have not configured boot_wait yet this is a good time to do
it:
nvram set boot_wait=on
nvram commit
The following command is needed to initialize the access point:
firstboot
Now it is time to connect the access point "Internet" port to your
Internet connection.
Disconnect power, and turn it on again.
Telnet back into the access point. You should now be able verify your
configuration by pinging a connection in the Internet. If you are not
able to access the Internet you need to fix this before proceeding.
Installing Tun/Tap
ChilliSpot uses the Tun/Tap driver. To install the driver change to the
tmp
directory:
cd /tmp/
The driver is installed by issuing the following commands:
wget http://www.wildcatwireless.net/wrt54g/tun-modules_2.4.20-wrt1_mipsel.ipk
ipkg install tun-modules_2.4.20-wrt1_mipsel.ipk
The tun module is loaded by issuing the following command:
insmod tun
The above line should be included in /etc/init.d/S10boot in order to
load the module when the access point is restarted. To edit
/etc/init.d/S10boot you first need to remove the symlink, copy the file
from rom, and use vi to edit the file:
rm /etc/init.d/S10boot
cp /rom/etc/init.d/S10boot /etc/init.d/S10boot
vi /etc/init.d/S10boot
Configure networking
OpenWRT is born with the following network interfaces:
- eth0: LAN Switch. Is used as the connection point for the VLANs.
Do never use this port directly.
- eth1: Wireless Interface
- vlan1: Virtual LAN: Internet
- vlan0: Virutal LAN: Port 1 to 4
- br0: Bridge between vlan0 and eth1.
Assuming that you only want to use ChilliSpot on the wireless interface
you should remove eth1 this from the bridge:
nvram set lan_ifnames="vlan0 eth3"
nvram commit
/etc/init.d/S40network restart
Installing ChilliSpot
ChilliSpot is installed by issuing the commands:
wget http://www.chillispot.org/download/chillispot_1.0-1_mipsel.ipk
ipkg install chillispot_1.0-1_mipsel.ipk
Configure Firewall
Following the network configuration you should now review and modify
the firewall rules. You can use the script in /etc/firewall.openwrt as
a starting point:
rm /etc/init.d/S45firewall
cp /etc/firewall.openwrt /etc/init.d/S45firewall
chmod 755 /etc/init.d/S45firewall
vi /etc/init.d/S45firewall
As default the above firewall rules trust the LAN interface of the
OpenWRT. You might want to change that, but be careful not to
configure the firewall so that you lose connectivity.
Web server
If you are using your own web server you should follow the instructions
under Fedora on how to install hotspotlogin.cgi on
the web server.
Radius server
If you are using your own radius server you should follow the
instructions under Fedora on how to install the radius server.
/etc/chilli.conf
Assuming the radius server is installed on IP address 1.2.3.4 and the
web server is installed on IP address 5.6.7.8 you should use
the following chilli.conf configuration file:
radiusserver1 1.2.3.4
radiusserver2 1.2.3.4
radiussecret testing123
dhcpif eth1
uamserver https://5.6.7.8/cgi-bin/hotspotlogin.cgi
Final test
You are
now ready to test your new installation:
chilli --debug --fg
If everything is working you can include the following line at the
bottom of /etc/init.d/S50services in order to start ChilliSpot
automatically at
reboot:
sleep 5s
/usr/sbin/chilli
To do the final test you should now disconnect power, and turn the
access point on again. Your HotSpot should be working once the access
point has rebooted.
As mentioned above the OpenWRT port is still experimental. If you are
not experienced with OpenWRT you should wait for the port to mature
before installing.
Installing from source
Requirements
ChilliSpot uses the tun package. You need at least tun
version 1.1. With Linux tun is normally included from kernel version
2.4.7, but you need to make sure that the "/dev/net/tun" device exists
and that the tun module is loaded. For
more information see the tun
homepage.
Get hold of the ChilliSpot source code from www.chillispot.org.
Compilation
Compilation and installation
is performed by issuing the following commands:
tar -zxf chillispot-1.0.tar.gz
cd chillispot-1.0
./configure
make
make install
Network Interface
Configuration
For most installations eth0 will be the interface connected to the
Internet, and eth1 will be the interface connected to the access points.
- eth0: Should configured and connected to the Internet (or
intranet). Routing, default gateway and DNS need to be working.
- eth1: Should not be
configured with an IP address, but be in the
UP state (ifconfig eth1 up). For advanced configurations you can
configure eth1 with an IP address to use for access point management
traffic.
NAT
For almost all types of installations you need to enable NAT on the
external interface.
DHCP Server
Do not run a DHCP server. Chillispot will take care of IP address
allocation.
chilli.conf
If ChilliSpot, Web server and Radius server is installed on the same
machine you should use the following configuration file:
radiusserver1 127.0.0.1
radiusserver2 127.0.0.1
radiussecret testing123
dhcpif eth1
uamserver https://192.168.182.1/cgi-bin/hotspotlogin.cgi
Web server
See the instructions under Fedora on how to install hotspotlogin.cgi on
the web server.
Radius server
See the instructions under Fedora on how to install the radius server.
Client Configuration
Universal Access
Method
With universal access method (UAM) the wireless client is redirected to
a login web page. Once a valid username and password is presented the
wireless client is allowed to access the external network (Internet or
intranet). Using UAM involves the following steps in the client:
- Installing a wireless LAN card (Follow manufactures instructions)
- Associating with an access point in the hotspot.
- Start the browser. Instead of the normal homepage the browser
will be redirected to the HotSpot login page.
- Type in username and password. This needs to match a username and
password previously configured in the radius server.
After this the client is allowed to access the external network. The
wireless client will be logged out by DHCP timeout, or by returning to
the login page and issuing a logout.
With UAM the traffic between the wireless client and the access point
is transmitted unencrypted. This means that anybody with the right
equipment can monitor the communications, and it is also possible to
hijack existing connections. For many usage scenarios this lack of
security is not an issue, but for other usage scenarios UAM is not
suitable.
The general user instructions are:
- Change the WLAN SSID to chillispot (or whatever SSID you
configured
on the access point).
- The PC should
connect to the access point automatically (at least if you are using MS
Windows).
- Start the web browser. When the web browser is started chilli
should
redirect the user to your authentication web server.
- The user should type in his username and password (as configured
in
the radius server)
- The login is confirmed, and the user is free to browse the
Internet.
- If anything goes wrong: Make sure that WLAN web encryption is
turned off,
and that the web browser proxy settings are enabled. Restart the
PC.
WPA
Wireless Protected Access (WPA) solves most of the security problems
associated with the universal access method. WPA uses the Extensible
Authentication Protocol (EAP) which offers a wide range
of authentication methods. With WPA it is possible to encrypt the
traffic between the wireless client and the
access point.
WPA has to be supported by both the client wireless LAN card as well as
the operating system. Microsoft provides a WPA package for Windows XP
service pack 1.
Customizing ChilliSpot
The installation of ChilliSpot can be customized in a number of
areas.
Universal Access
Method
The web pages presented when logging in using UAM can be changed by
modifying the perl script "/var/www/cgi-bin/hotspotlogin.cgi".
The perl script uses TLS encryption in order to protect username and
password. As default Apache uses a self-signed server certificate. This
causes the web browser to ask the user if the certificate should be
accepted. In order to avoid this a properly signed server certificate
needs to be installed. See the Apache documentations for information on
how to obtain and install server certificated.
In this configuration we used a webserver installed on ChilliSpot.
It is however also possible to use a separate web server. This might be
an advantage if a server certificate is to be installed.
Protection against
dictionary attacks
When a user has entered his username and password on the authentication
web server a CHAP-MD5 response is calculated and send back to chilli.
There is no way of calculating the users password from the response,
but if a malicious hacker is able to guess the password he can validate
the password against the response. This is known as a dictionary
attack, and applies when a user uses a weak password (such as the name
of her boyfriend). To protect against dictionary attacks ChilliSpot
uses a shared secret between the web server and chilli. In
hotspotlogin.cgi you should
uncomment and edit the line which reads:
$uamsecret = "ht2eb8ej6s4et3rg1ulp";
You should modify this secret to some random string which only you
know. The same secret should be inserted in the file /etc/chilli.conf:
uamsecret ht2eb8ej6s4et3rg1ulp
You need to restart chilli in order for the configuration changes to
take effect:
/etc/init.d/chilli restart
WPA
In order to enable Wireless Protected Access (WPA) you need to
configure your access point for this, and tell it to use chilli as the
radius server. Then you need to modify the following parameters in the
file /etc/chilli.conf:
- proxylisten
- proxyport
- proxyclient
- proxysecret
Also you need to upgrade your client to support WPA and to enable EAP
on the radius server.
IP Address Ranges
IP address ranges can also be changed by modifying the configuration
file /etc/chilli.conf.
Uninstalling
ChilliSpot
ChilliSpot is uninstalled by issuing the command:
rpm -e chillispot
Furthermore the changes made to other parts of the system should be
reversed as well (FreeRadius, Apache and the firewall).
Files Created or Used
|
Directories
|
| /usr/share/doc/chillispot-1.0/ |
Directory of user documentation,
example scripts and configuration files.
|
|
|
|
Files
|
| /usr/sbin/chilli |
ChilliSpot executable |
/etc/chilli.conf
|
ChilliSpot configuration file
|
/etc/rc.d/init.d/chilli
|
ChilliSpot System V
initialization script.
|
| /var/www/cgi-bin/hotspotlogin.cgi
|
Perl cgi script performing
universal access method login. |
|
|
|
Manual
pages
|
chilli (8)
|
ChilliSpot manual. |
Known Problems
Login does not work
with some versions of PalmOS
For some reason login does not work with the PalmOS web browser when
javascript is enabled.
Workaround: Turn off javascript in the PalmOS browser.
ChilliSpot Daemon
fails to start after OpenWRT is rebooted
This is caused by the DNS not working when the ChilliSpot daemon is
started.
Workaround: Delay startup of the ChilliSpot daemon by inserting a sleep
5 in /etc/init.d/S50services.
Interworking problems with PPTP type VPN (Microsoft) together with
NAT on openWRT.
A lot of problems have been observed regarding PPTP. In come cases it
works. In other it doesn't. The cause of this problem is not yet
identified.